

CERAKOTE Ceramic Headlight Restoration Kit Review: A Simple, Long-Lasting Fix for Hazy Lenses
Introduction
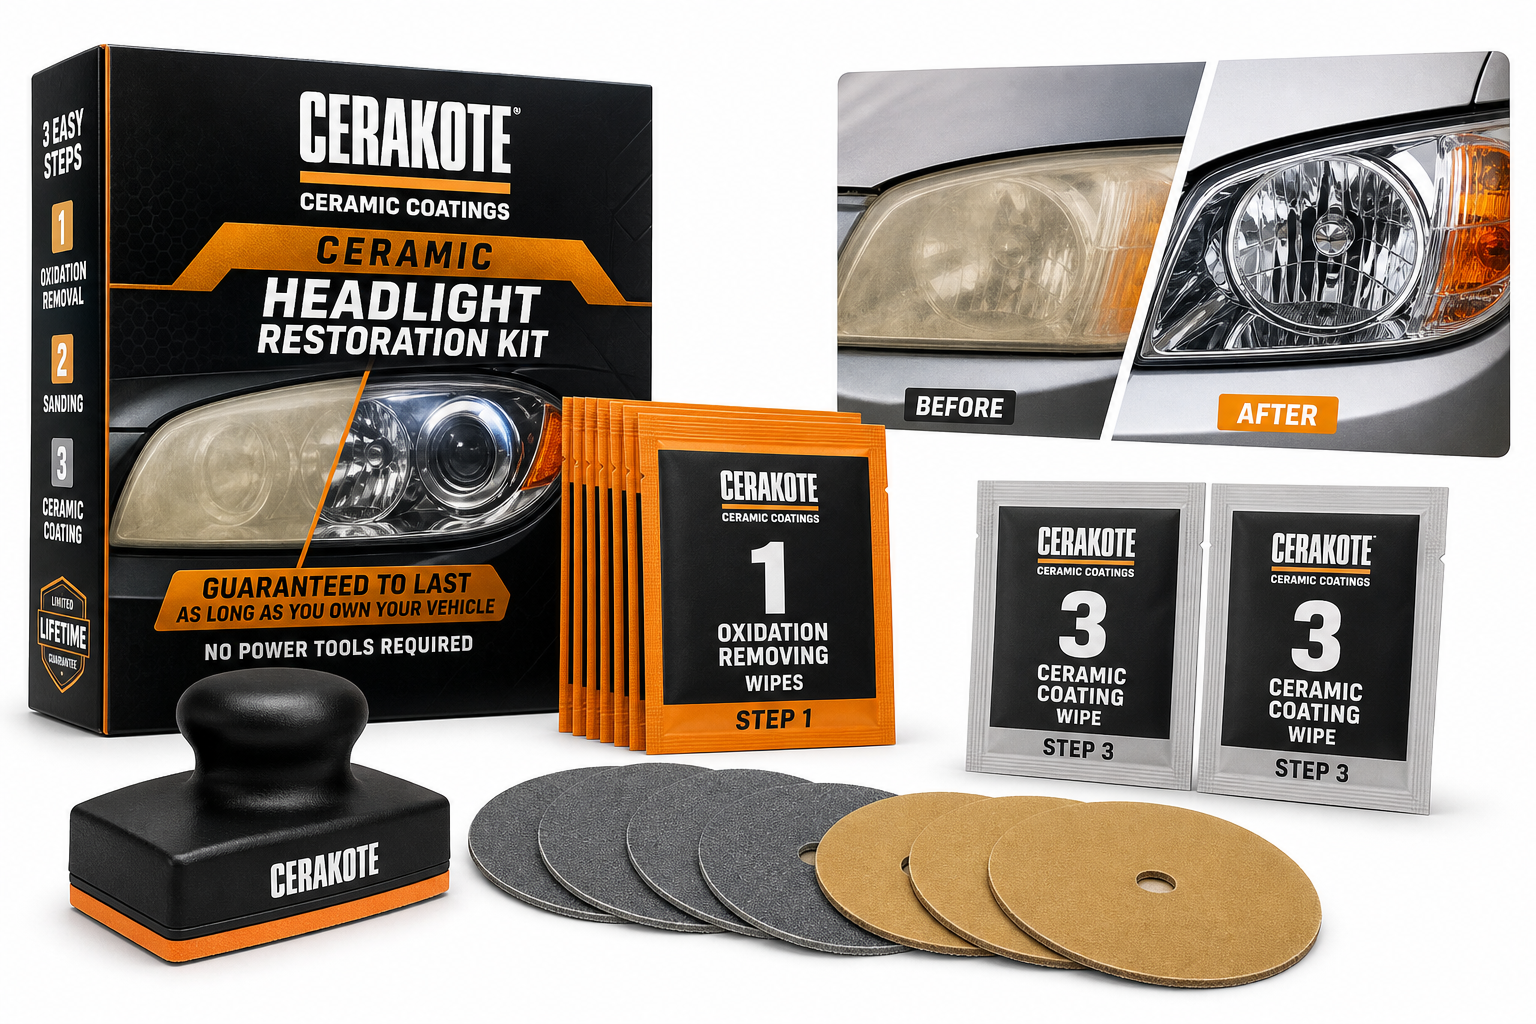
The CERAKOTE® Ceramic Headlight Restoration Kit – Guaranteed To Last As Long As You Own Your Vehicle – Brings Headlights Back to Like New Condition - No Power Tools Required - 10 Wipe Kit targets one of the most common aging issues on modern vehicles: cloudy, yellowed plastic headlight lenses. Instead of relying on temporary polishes or requiring a drill-mounted pad, this kit combines a wipe-based oxidation remover, light wet sanding, and a wipe-on ceramic coating that is intended to last for the remaining life of the vehicle.
Available on Amazon at around $17.95, this kit is positioned as a DIY alternative to both professional restoration services and full headlight replacement.
Key Points
- Three-step system: Oxidation removal, controlled sanding, and ceramic UV coating.
- No power tools required: All work is done by hand with included wipes, sanding discs, and a pommel.
- Ceramic-based protection: Uses a true ceramic coating designed to bond to plastic and resist UV degradation over time.
- Kit contents for two headlights: Enough product to restore and coat a pair of headlamps in a single kit.
- Time commitment: Typically about 30 minutes per vehicle once you understand the process.
- Target user: DIY vehicle owners whose headlights are hazy, yellowed, or lightly pitted, but structurally intact.
Experience
What’s in the box
The CERAKOTE kit is built around a structured, numbered process. In a typical kit you’ll find:
- Step 1 Oxidation Removing Wipes (8) – Pre-soaked wipes that chemically break down and remove the top oxidized layer on the lens.
- Sanding pommel (1) – A small hand tool used as a backing pad for the sanding discs, making even pressure easier.
- Sanding discs (4) – Usually two different grits; these level out remaining imperfections and deeper oxidation after the wipes.
- Step 3 Ceramic Coating Wipes (2) – Single-use wipes saturated with a clear ceramic coating that leaves a glossy, protective layer on the lens.
Everything needed to complete the job on two headlights is included, aside from basics like masking tape, water for wet sanding, and towels for cleanup.
Application process
The process is deliberately simple and well-documented:
-
Preparation and masking
Before starting, you should clean the headlight lenses with soap and water and dry them thoroughly. It’s strongly recommended to mask off surrounding paint and trim with painter’s tape to avoid accidental scuffs during sanding or chemical contact from the wipes. -
Step 1 – Oxidation removal
The first set of wipes is used to aggressively rub the lens surface. On heavily oxidized lights, the wipes will pull off a noticeable yellow or brown residue. You continue wiping until the pads no longer pick up significant discoloration and the lens looks uniformly hazy but cleaner. -
Step 2 – Sanding
With the sanding pommel and discs, you wet-sand the lenses to level remaining defects. The kit typically provides a coarser and a finer grit; starting with the coarser disc, you work in overlapping passes, rinsing periodically to check progress. You then move to the finer disc to refine the surface and remove sanding marks. After this step, the lens will appear uniformly frosted—this is expected. -
Step 3 – Ceramic coating
Once the lenses are completely clean and dry, the ceramic coating wipes are used in smooth, overlapping strokes. This instantly transforms the frosted surface into a clear, glossy finish. Streaks can usually be avoided by maintaining a consistent pattern and not overworking the coating as it flashes off.
Skill level and learning curve
The procedure is manageable for most DIY users. The main learning points are:
- Being patient with the sanding step so that all oxidation and previous clear coat are removed.
- Ensuring the lenses are dry and dust-free before applying the ceramic coating.
- Using light, even pressure with the coating wipes to avoid ridges or high spots.
Owners accustomed to typical compound-and-polish kits may find the wipe-based chemistry and permanent-style ceramic coat an improvement, particularly on older vehicles where repeated polishing no longer delivers lasting clarity.
Performance and durability
When applied correctly, the kit can restore significantly oxidized headlights from a yellowed, cloudy appearance to a clear, nearly like-new finish. Because the final layer is a ceramic coating rather than a simple sealant, the manufacturer backs the product with a limited lifetime guarantee for as long as you own the vehicle, assuming normal exposure conditions.
Compared with abrasive-only kits that may cloud back over in a year or less, this approach aims to combine cosmetic correction with a robust UV barrier. In practice, this means many users can expect to do a complete restoration once, followed by basic washing rather than frequent re-polishing.
Pros
- Effective clarity restoration: Capable of reversing moderate to heavy oxidation, yellowing, and surface haze on plastic lenses.
- Integrated ceramic UV protection: The final coating step is a ceramic layer designed to bond to the lens and resist future degradation.
- All-in-one kit: Includes wipes, sanding pommel, and discs; no power tools or separate compounds are required.
- Straightforward instructions: Step-marked components and clear sequencing reduce confusion during the process.
- Good value versus replacement: Even at around $17.95, it is typically far less expensive than new headlights or professional restoration.
- Suitable for a wide range of vehicles: Works on most polycarbonate automotive headlight lenses, regardless of make or model, provided they are structurally intact.
Cons
- Single-use coating wipes: If you make a mistake or miss a spot, there is no extra ceramic wipe in most kits, so corrections can be limited.
- Physical effort required: Although no power tools are needed, heavily oxidized lenses still demand thorough hand sanding, which can be tiring.
- Not a fix for internal damage: The kit only treats the exterior lens surface; internal moisture damage, delamination, or reflector issues will remain.
- Surface prep sensitive: Skipping steps or rushing sanding can lead to uneven clarity or visible sanding marks beneath the coating.
- Limited flexibility for repeated applications: Because the coating is designed for long-term durability, fully redoing the process in the future may require re-sanding through the ceramic layer.
Verdict
The CERAKOTE Ceramic Headlight Restoration Kit offers a well-thought-out solution for vehicle owners seeking a durable, DIY restoration option without specialized tools. Its combination of oxidation-removal chemistry, controlled sanding, and a true ceramic topcoat sets it apart from simpler polish-only kits that tend to provide short-lived results.
While the process still requires careful surface preparation and some elbow grease, the payoff is substantial: in many cases, headlights can be brought back to near-factory clarity, with the ceramic layer helping to preserve that result for years rather than months. For drivers comparing options between low-cost polishes and costly headlight replacements, this kit at around $17.95 represents a compelling middle ground.
If your headlights are externally oxidized but otherwise intact, and you are comfortable following step-by-step instructions, the CERAKOTE Ceramic Headlight Restoration Kit is a strong contender that can meaningfully improve nighttime visibility and vehicle appearance without a trip to the body shop.